아직 최종본이 아니기 때문에 코드를 깔끔하게 정리하지는 못했지만,
거의 원하는 기능은 완성했고, 여러가지 YOLO가 detect를 제대로 하지 못해 발생하는 오류들을 잡고,
객관식에 대한 수정만이 남았기 떄문에 일단 글을 작성해 보기로 한다.
Jupyter Notebook을 이용했다.
일단 나의 목표는 다음과 같다.
1. 라이브러리 임포트 및 모델/이미지 불러오기
#필요라이브러리
import cv2
import numpy as np
import json
from darkflow.net.build import TFNet
import matplotlib.pyplot as plt
from collections import OrderedDict
import requests
import sys
import time
ocr과 darkflow model을 사용하기 위한 라이브러리는 다음과 같다.
이제 YOLO를 학습시킨 후 결과로 얻은 .pb , .meta, .cfg 파일을 불러온다.
#모델불러오기
options = {"model": "./cfg/my-tiny-yolo.cfg",
           "pbLoad": "./darkflow/built_graph/my-tiny-yolo.pb",
           "metaLoad": './darkflow/built_graph/my-tiny-yolo.meta' , "threshold": 0.4
          }

tfnet = TFNet(options)
이제 detection을 진행할 이미지를 불러와서 다음과 같이 처리해준다.
5개를 불러온 이유는 이미지에 바운딩박스를 실제로 시각화해서 보여주기 위해 불러온 것이며, 실제론 1장만 필요하다.
#이미지 불러오기 -> 편하게 시각화용도로 5개 사용

#1.최초 모델의 detection
img = cv2.imread('./img/img12.jpg',cv2.IMREAD_COLOR)
img = cv2.cvtColor(img,cv2.COLOR_BGR2RGB)

#2-1. 왼쪽 페이지의 detection
img2 = cv2.imread('./img/img12.jpg',cv2.IMREAD_COLOR)
img2 = cv2.cvtColor(img2,cv2.COLOR_BGR2RGB)

#2-2. 오른쪽 페이지의 detection
img3 = cv2.imread('./img/img12.jpg',cv2.IMREAD_COLOR)
img3 = cv2.cvtColor(img2,cv2.COLOR_BGR2RGB)

#3. 중복 detection제거후
img4 = cv2.imread('./img/img12.jpg',cv2.IMREAD_COLOR)
img4 = cv2.cvtColor(img2,cv2.COLOR_BGR2RGB)

#4. 실제 cropped and OCR에 사용할 이미지
img5 = cv2.imread('./img/img12.jpg',cv2.IMREAD_COLOR)
img5 = cv2.cvtColor(img2,cv2.COLOR_BGR2RGB)
results = tfnet.return_predict(img)
2. 모델 detection 및 시각화
##vanila version model detection
colors = [tuple(255*np.random.rand(3)) for _ in range(50)]
#detect 실행
results = tfnet.return_predict(img)
#결과출력
#color와 results의 값 하나하나를 짝지음
for color, result in zip(colors, results):
t1 = (result['topleft']['x'], result['topleft']['y'])
br = (result['bottomright']['x'], result['bottomright']['y'])
label = result['label']
#바운딩 박박스 그리기
img = cv2.rectangle(img, t1, br,color, 7)
#바운딩 박스에 label달기
img = cv2.putText(img, label, t1, cv2.FONT_HERSHEY_COMPLEX, 1, (0,0,0),2)
print(result)
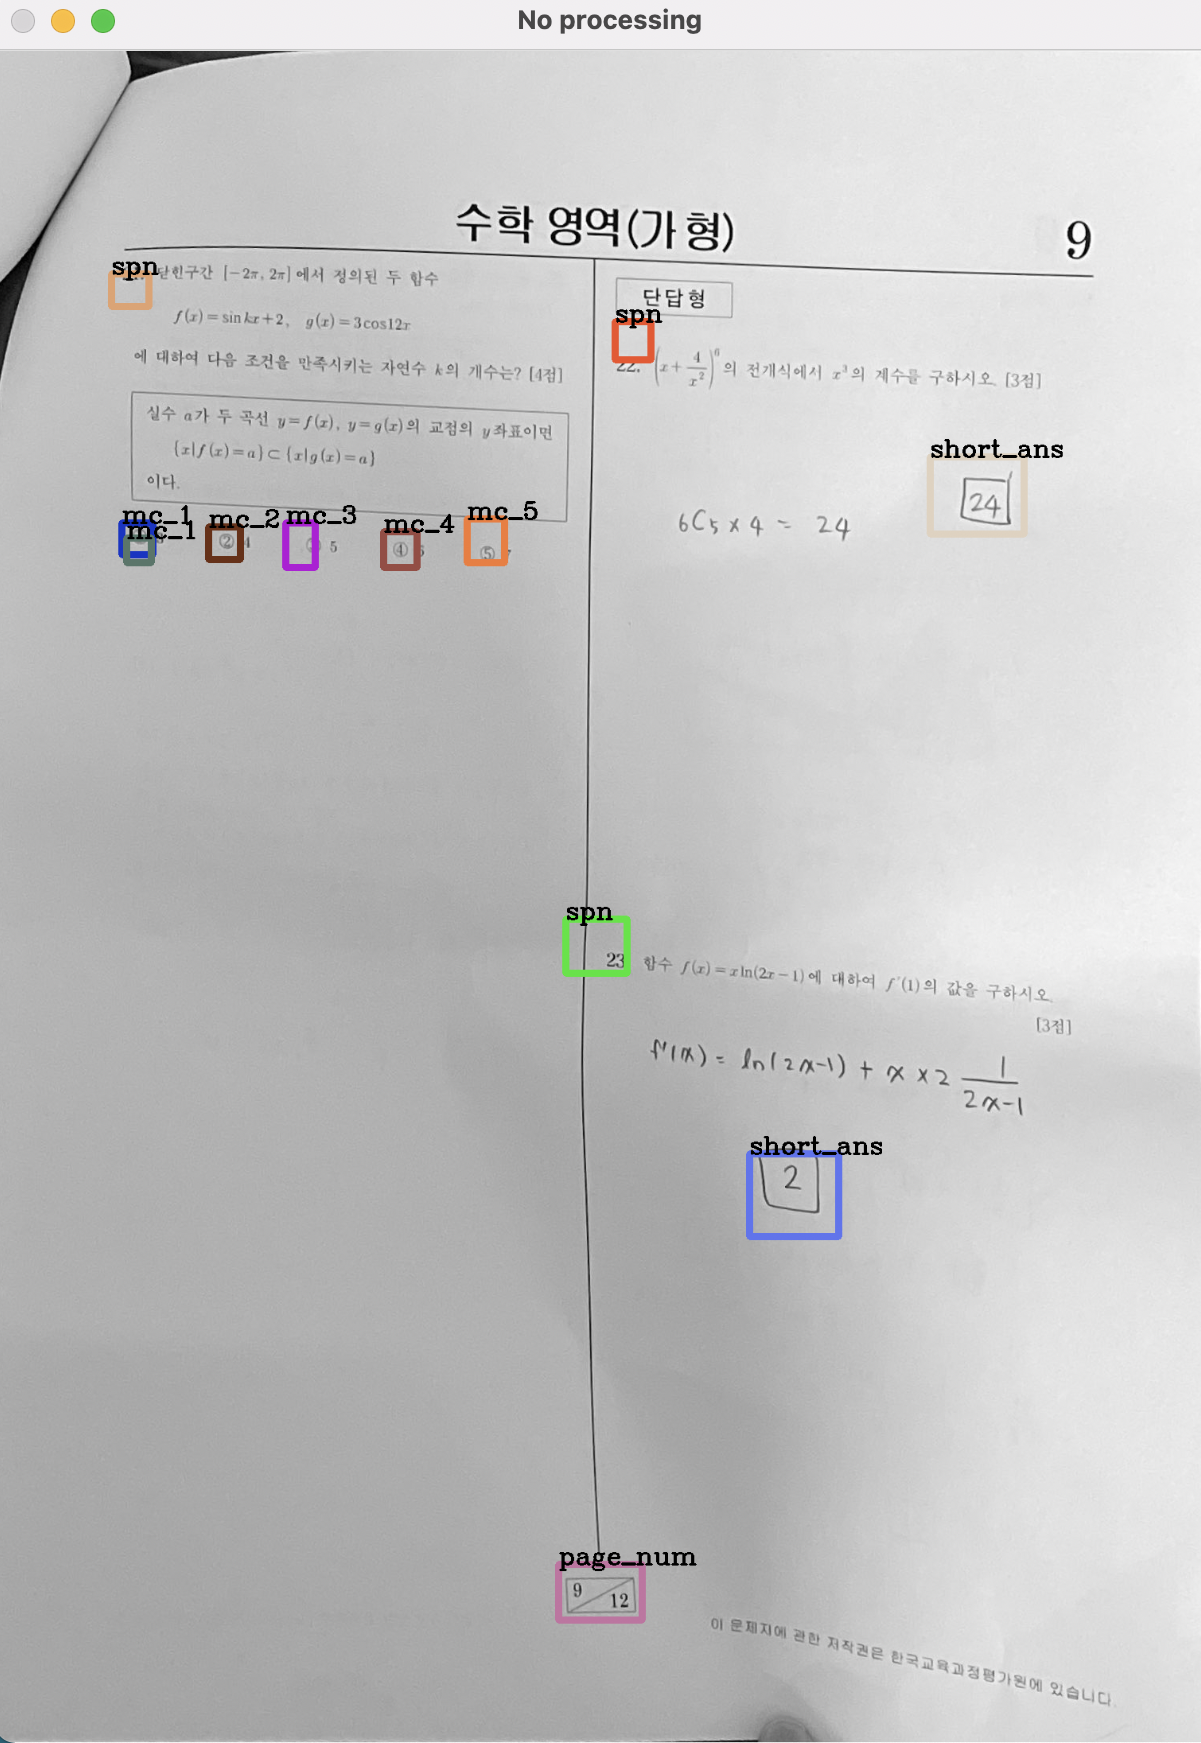
#결과 출력버전 시각화
cv2.imshow("No processing",img)
k = cv2.waitKey(0)
cv2.destroyWindow("No processing")이제 어떠한 처리도 하지 않은 모델의 순수한 detection결과를 얻기위해 다음과 같이 matplotlib를 이용하여 바운딩 박스를 그려준다.
{'label': 'spn', 'confidence': 0.5255311, 'topleft': {'x': 148, 'y': 295}, 'bottomright': {'x': 182, 'y': 356}}
{'label': 'spn', 'confidence': 0.6987056, 'topleft': {'x': 143, 'y': 304}, 'bottomright': {'x': 168, 'y': 341}}
{'label': 'mc_1', 'confidence': 0.9240269, 'topleft': {'x': 762, 'y': 411}, 'bottomright': {'x': 801, 'y': 464}}
{'label': 'mc_1', 'confidence': 0.51279587, 'topleft': {'x': 754, 'y': 390}, 'bottomright': {'x': 797, 'y': 437}}
{'label': 'mc_1', 'confidence': 0.7220049, 'topleft': {'x': 162, 'y': 486}, 'bottomright': {'x': 201, 'y': 527}}
{'label': 'mc_2', 'confidence': 0.9473156, 'topleft': {'x': 868, 'y': 422}, 'bottomright': {'x': 905, 'y': 469}}
{'label': 'mc_2', 'confidence': 0.947199, 'topleft': {'x': 266, 'y': 486}, 'bottomright': {'x': 305, 'y': 536}}
{'label': 'mc_3', 'confidence': 0.9578537, 'topleft': {'x': 978, 'y': 423}, 'bottomright': {'x': 1013, 'y': 467}}
{'label': 'mc_3', 'confidence': 0.52462864, 'topleft': {'x': 984, 'y': 442}, 'bottomright': {'x': 1013, 'y': 478}}
{'label': 'mc_3', 'confidence': 0.94658095, 'topleft': {'x': 368, 'y': 478}, 'bottomright': {'x': 403, 'y': 536}}
{'label': 'mc_4', 'confidence': 0.8875051, 'topleft': {'x': 1088, 'y': 423}, 'bottomright': {'x': 1132, 'y': 464}}
{'label': 'mc_4', 'confidence': 0.89787793, 'topleft': {'x': 471, 'y': 476}, 'bottomright': {'x': 512, 'y': 533}}
{'label': 'mc_4', 'confidence': 0.5804925, 'topleft': {'x': 453, 'y': 488}, 'bottomright': {'x': 492, 'y': 532}}
{'label': 'mc_5', 'confidence': 0.8238286, 'topleft': {'x': 1198, 'y': 416}, 'bottomright': {'x': 1240, 'y': 459}}
{'label': 'mc_5', 'confidence': 0.80670226, 'topleft': {'x': 568, 'y': 480}, 'bottomright': {'x': 621, 'y': 536}}
{'label': 'page_num', 'confidence': 0.88520133, 'topleft': {'x': 636, 'y': 1847}, 'bottomright': {'x': 760, 'y': 1926}}
json파일로는 다음과 같이 나온다. -> backend에 전달되는 것은 어쩌피 이 파일이다
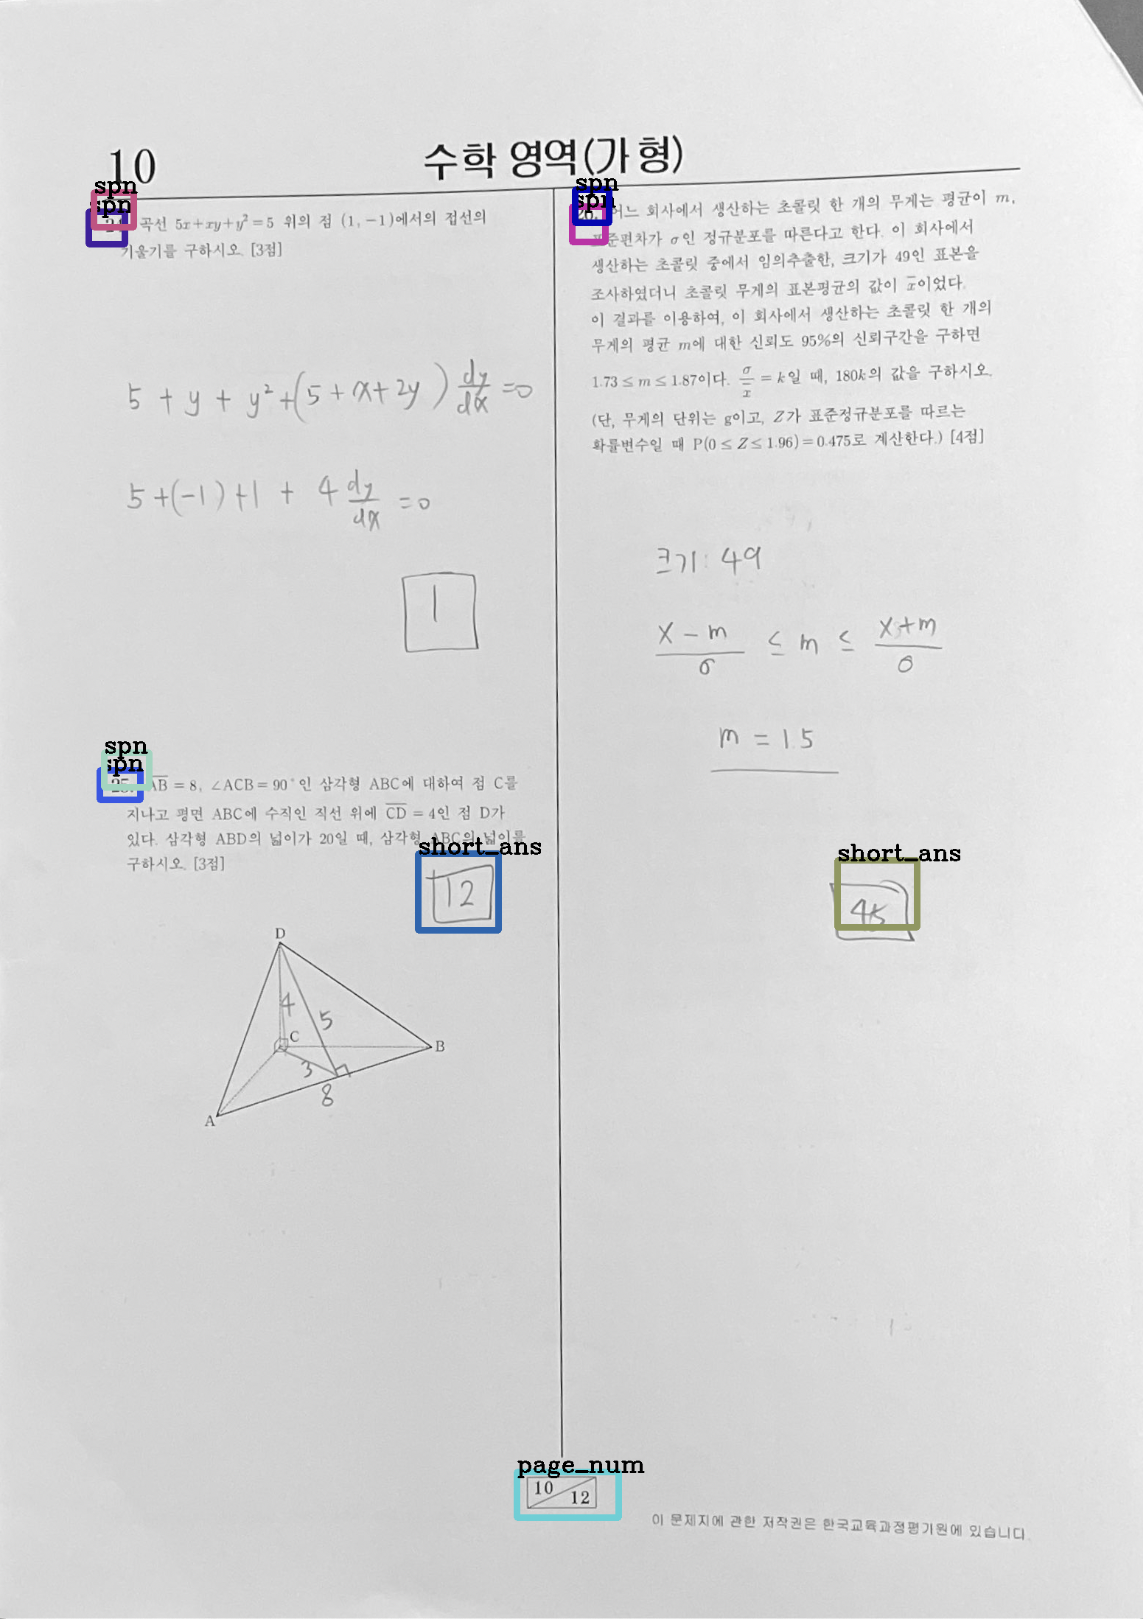
다음과 같은 결과를 얻을 수 있다.
다음 사진은 매우 잘 detection이 진행된 예제라고 볼 수 있어 큰 문제가 발견되지 않지만,
발생할 수 있는 문제로는 다음과 같다.
1. detection 자체를 해내지 못함
→ 발생할 수 있는 문제 : 가장 큰 문제이나, 사실 해결방법은 없다. 소수의 것을 탐지해내지 못한 것은 페이지 번호를 이용해 해당 페이지에 어떤 문제번호가 존재하는지 검색하여 빠트린 문제번호를 찾아내는 등 백엔드에서 약간의 보정은 가능하지만, 이건 모델 성능 자체의 문제라 코드상으로 해결은 할 수가 없다...
하지만, 이와 같은 경우 하나의 문제가 한 덩어리를 이루어 spn ~ mc_5 또는 spn~short_ans 이런식으로 짝을 이루어 순서대로 넘어가야 백엔드에서 여러가지 처리가 가능하다!
2. 하나의 object에 대해서 여러개의 detection을 해냄
→ 발생할 수 있는 문제 : 문제번호, 페이지번호, 주관식 답 과 같은 경우 해당 지점을 crop하여 ocr을 사용해야하는데, 여러개가 detection된 경우 ocr도 여러번 돌아가게 되고, 하나의 object에 대해 하나의 json으로 나오지 않아 복잡해진다. 따라서, 중복은 제거해서 넘겨주어야한다.
→ 예시 : mc_1가 2개 감지된 모습 ( 물론 multiple choice에 대해서는 ocr을 사용하지 않아 큰 상관은 없다)
3. location을 제대로 잡지 못함 (localization problem)
→ 발생할 수 있는 문제 : 문제번호, 페이지번호, 주관식 답 과 같은 경우 해당 지점을 crop하여 ocr을 사용해야하는데, 위치가 제대로 잡히지 않으면 숫자를 읽어낼 수 없다. 글자가 포함될 수 있도록 여백을 주어 잘라서 넘겨주어야 함
→ 예시 : 위의 red box (spn)을 보면, 저상태로 crop해 ocr로 넘어가면 읽을 수 없을 것
빨간색으로 작성한 3가지 내용을 수행해 보도록 하겠다.
3. 문제 순서대로 배치하기
객관식 1~5번까지의 순서는 중요하지 않다.
json파일의 배치가 문제 번호 순서대로, 시작은 label : spn으로 시작하여 그 뒤로 mc_1~ mc_5 또는 short_ans가 나오고 그 다음으로는 다음 문제번호 label : spn이 등장해야한다.
그리고 마지막은 page_num으로 끝나야한다.
이것이 하나의 시험지에 대한 json파일의 구성이다.
이렇게 되면 y축을 기준으로 정렬을 하면 되지만, 시험지는 왼쪽 오른쪽에 각각 문제가 배치되기 때문에 일단 절반을 나눈 후 각각을 y축을 기준으로 정렬하여 합치면된다.
일단 시험지가 반을 기준으로 번호가 나누어지기 때문에 페이지를 반으로 분리한 뒤, y축에 대해 정렬해야한다.
기준은 bounding box 에서 bottomright의 x좌표를 택했는데,
이유는 이미지의 width/2 를 기준으로 오른쪽 왼쪽 페이지를 지정할 것인데, lefttop 의 x좌표를 택하게되면, 오른쪽 페이지의 중앙과 가까운 문제번호 같은 것들이 왼쪽페이지에 넘어갈 확률이 높기 때문이다.
또한, 이렇게 지정해야 page_num을 오른쪽 페이지의 맨 아래로 보낼수 있기 때문이다. ( json파일에서도 맨 아래)
1. 오른쪽 페이지와 왼쪽 페이지를 나눔
#2. 번호순서대로 정렬을 위해서 반으로 나누어 y축으로 정렬한다.

#x축을 기준으로 정렬함
result_fix2 = sorted(results, key=lambda result: (result['bottomright']['x']))

#왼쪽페이지 json을 저장할 list
left=[]

#오른쪽페이지 json을 저장할 list
right=[]

#왼쪽/오른쪽을 나눌 x좌표
half = img.shape[1]
print(half)

#x축을 기준으로 정렬한 것을 토대로 절반을 기준으로 오른페이지 왼페이지로 나눔
for result in (result_fix2):

    if(result['bottomright']['x']<half/2):
        left.append(result)
    else:
        right.append(result)
2. 나눠진 각각의 페이지를 y축으로 정렬
#출력해서 확인
left = sorted(left, key=lambda result: (result['bottomright']['y']))
right = sorted(right, key=lambda result: (result['bottomright']['y']))

print("LEFT =============================")
print(left)
print("RIGHT =============================")
print(right)
#2-1. 왼쪽페이지 시각화
colors = [tuple(255*np.random.rand(3)) for _ in range(50)]


for color, result in zip(colors, left):
    t1 = (result['topleft']['x'], result['topleft']['y'])
    br = (result['bottomright']['x'], result['bottomright']['y'])
    label = result['label']

    img2 = cv2.rectangle(img2, t1, br,color, 7)
    img2 = cv2.putText(img2, label, t1, cv2.FONT_HERSHEY_COMPLEX, 1, (0,0,0),2)
    print(result)

cv2.imshow("LEFT",img2)
k = cv2.waitKey(0)
cv2.destroyWindow("LEFT")


# 2-2. 오른쪽페이지 시각화
colors = [tuple(255*np.random.rand(3)) for _ in range(50)]


for color, result in zip(colors, right):
    t1 = (result['topleft']['x'], result['topleft']['y'])
    br = (result['bottomright']['x'], result['bottomright']['y'])
    label = result['label']

    img3 = cv2.rectangle(img3, t1, br,color, 7)
    img3 = cv2.putText(img3, label, t1, cv2.FONT_HERSHEY_COMPLEX, 1, (0,0,0),2)

cv2.imshow("RIGHT",img3)
k = cv2.waitKey(0)
cv2.destroyWindow("RIGHT")


#2-3. left, right로 나누어진 것을 하나의 json으로 합침
left.extend(right)

result_fix3 = left

print(result_fix3)
시각화 해서 결과를 보면, 다음과 같이 잘 나뉜 모습을 볼 수 있다.
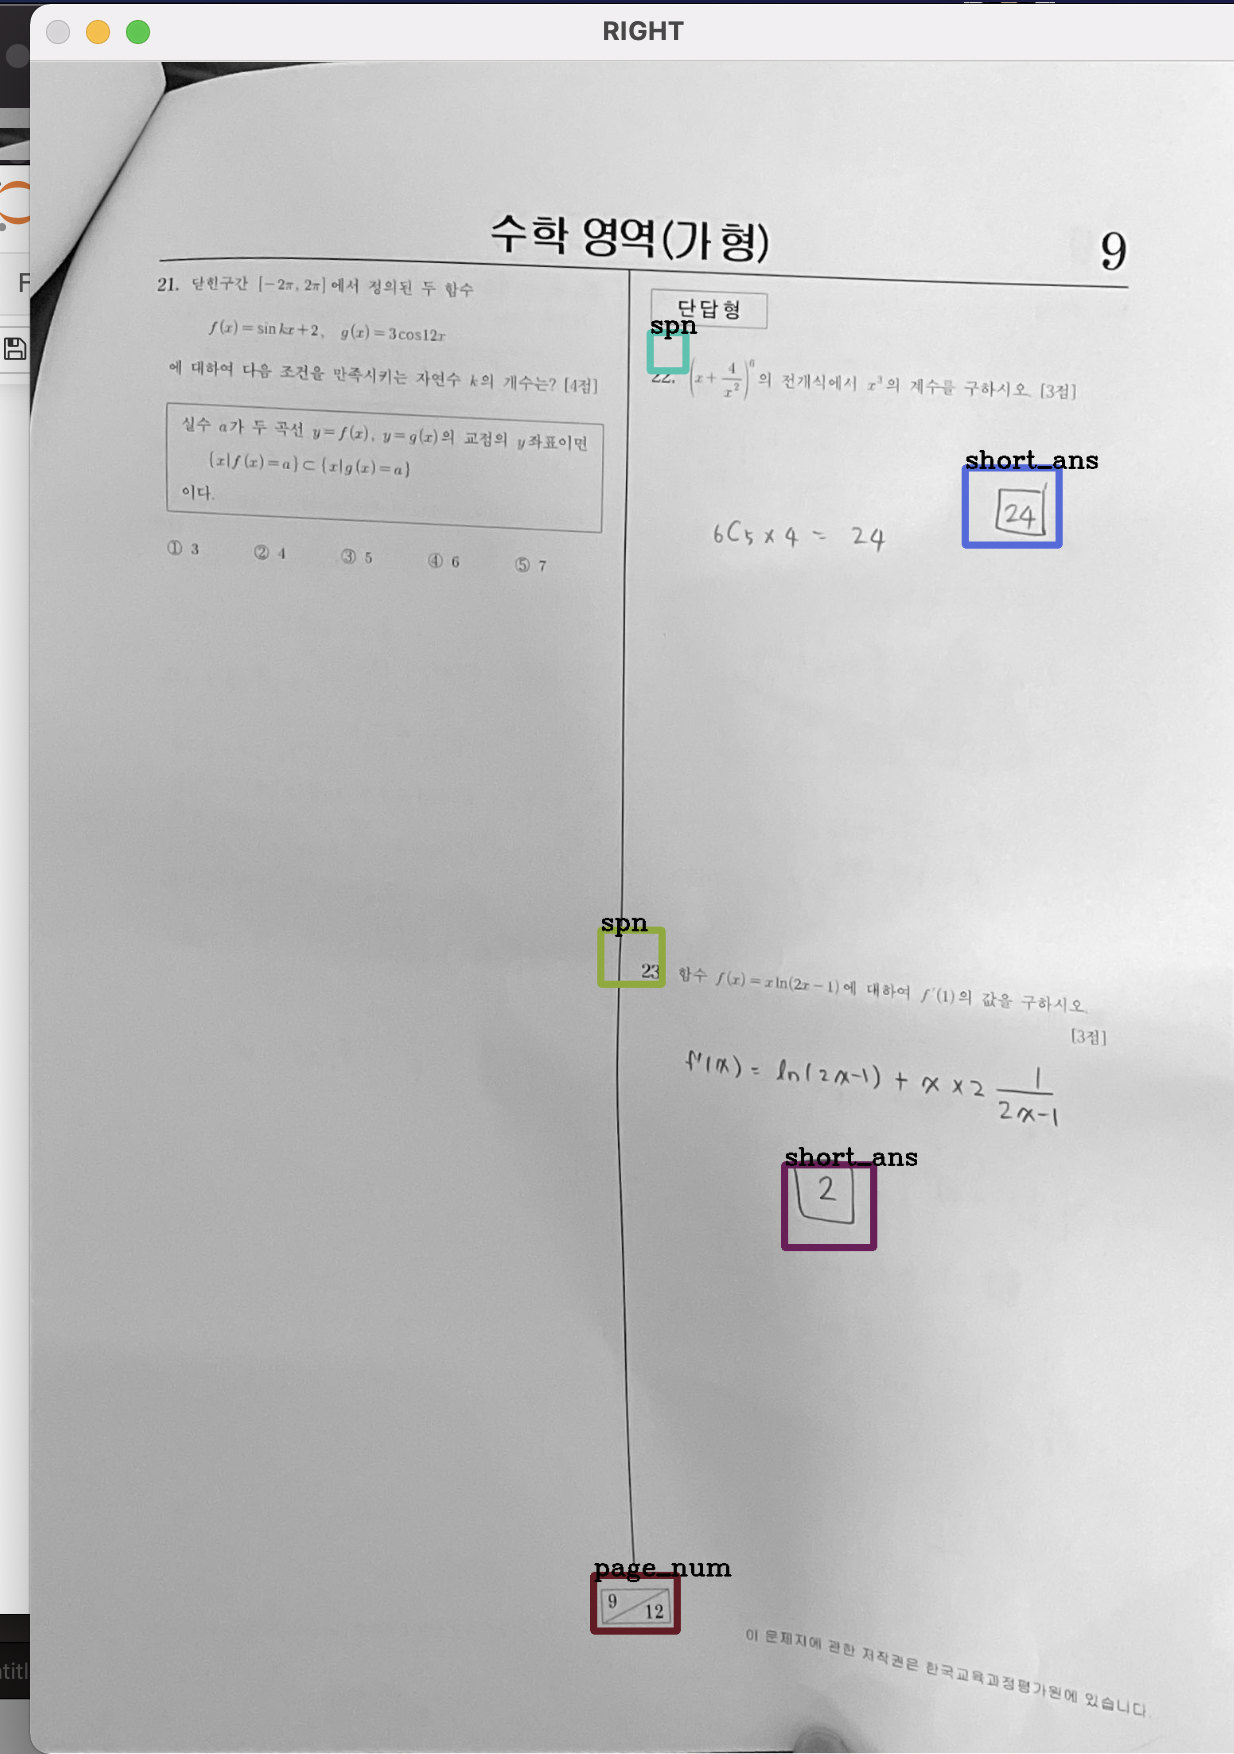
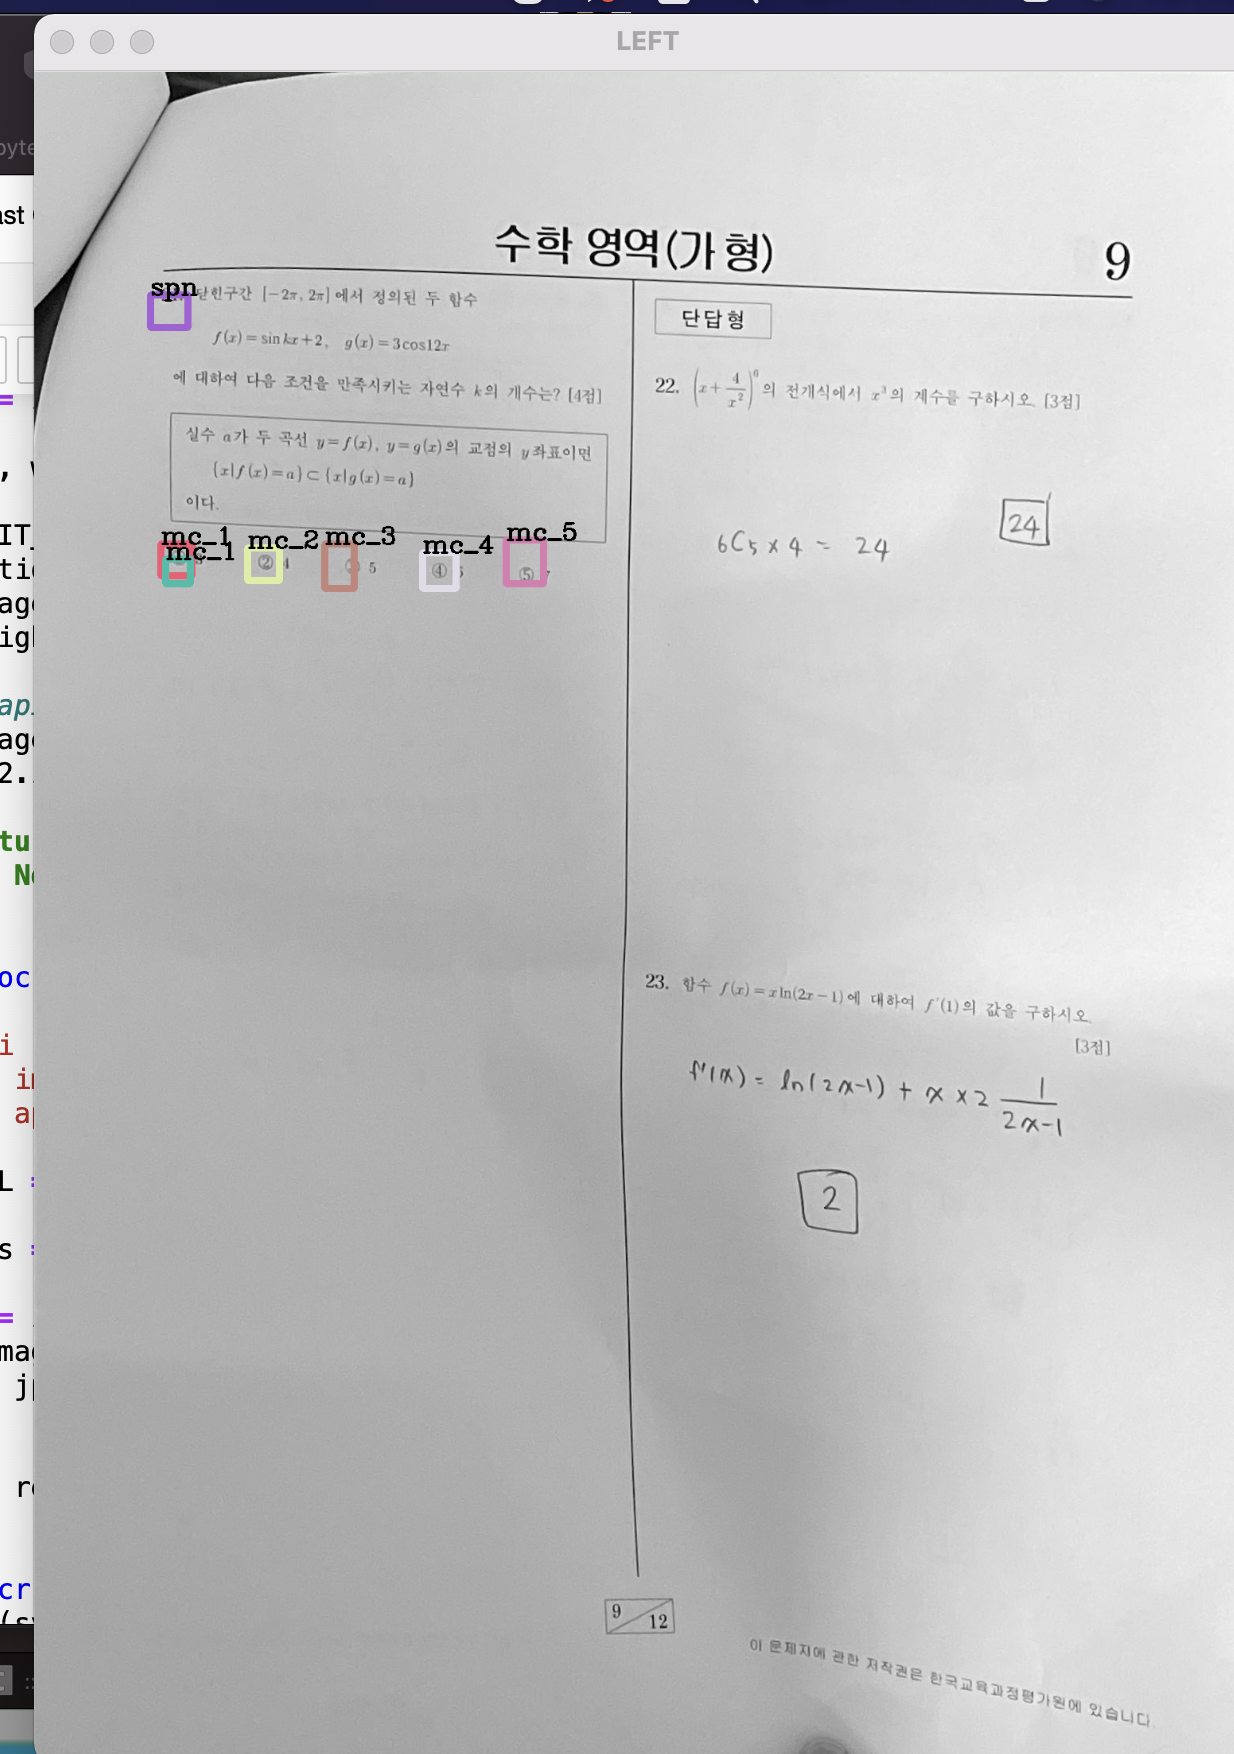
이를 각각 y축에 대해 정렬했으니, 문제번호에 맞게 정렬이 잘 되었을 것이며,
이를 합치기만 하면 순서대로 정렬은 완료되었다.
4. 중복으로 detection된 것 제거
방법은 다음과 같다.
정렬된 결과를 하나씩 가져오는데, 정렬이 완료되었으므로
같은 라벨이 연속으로 등장한다면 중복으로 간주하여 하나를 제거한다.
하나를 제거 할 때는 localization problem을 어느정도 해결하기 위해서, 더 큰 bounding box를 가진 객체를 남기고 작은 것을 삭제한다.
그리고 이는 모두 ocr을 위한 전처리이므로, ocr을 적용시킬 (문제번호 , 주관식답, 페이지번호) 에 대해서만 진행하도록 한다.
#3. 중복 detection을 제거

index = 0

for result in (result_fix3):
    if(index == 0):
        label_past = result['label']
        size_past = ((result['bottomright']['x']-result['topleft']['x'])**2 + (result['topleft']['y']-result['bottomright']['y'])**2)**0.5
    else:
        label_now = result['label']
        size_now = ((result['bottomright']['x']-result['topleft']['x'])**2 + (result['topleft']['y']-result['bottomright']['y'])**2)**0.5

        #OCR을 적용할 spn/short_ans/page_num에만 적용될 예정
        if(label_now=='spn' or label_now=='short_ans' or label_now=='page_num'):
            #이미 정렬되었으므로 연속으로 나오는 same label은 중복 detection으로 간주
            if(label_now == label_past):
                #크기가 더 작은 쪽을 제거함 -> 제거한 것을 출력해서 확인함
                if(size_now<size_past):
                    print("delete index : ")
                    print(index)
                    print(result_fix3[index])
                    del(result_fix3[index])
                else :
                    print("delete index : ")
                    print(index-1)
                    print(result_fix3[index-1])
                    del(result_fix3[index-1])

        label_past = label_now
        size_past = size_now
    index = index + 1

#print(result_fix3)

# 제거된 버전을 시각화
colors = [tuple(255*np.random.rand(3)) for _ in range(50)]


for color, result in zip(colors, result_fix3):
    t1 = (result['topleft']['x'], result['topleft']['y'])
    br = (result['bottomright']['x'], result['bottomright']['y'])
    label = result['label']

    img4 = cv2.rectangle(img4, t1, br,color, 7)
    img4 = cv2.putText(img4, label, t1, cv2.FONT_HERSHEY_COMPLEX, 1, (0,0,0),2)

cv2.imshow("FINAL",img4)
k = cv2.waitKey(0)
cv2.destroyWindow("FINAL")
제거된 버전을 시각화 한다.
하지만 이번예제는 깔끔하게 탐지되어서 중복이 거의 없으므로, 이번 예시에서만 다른 사진을 가져왔다.
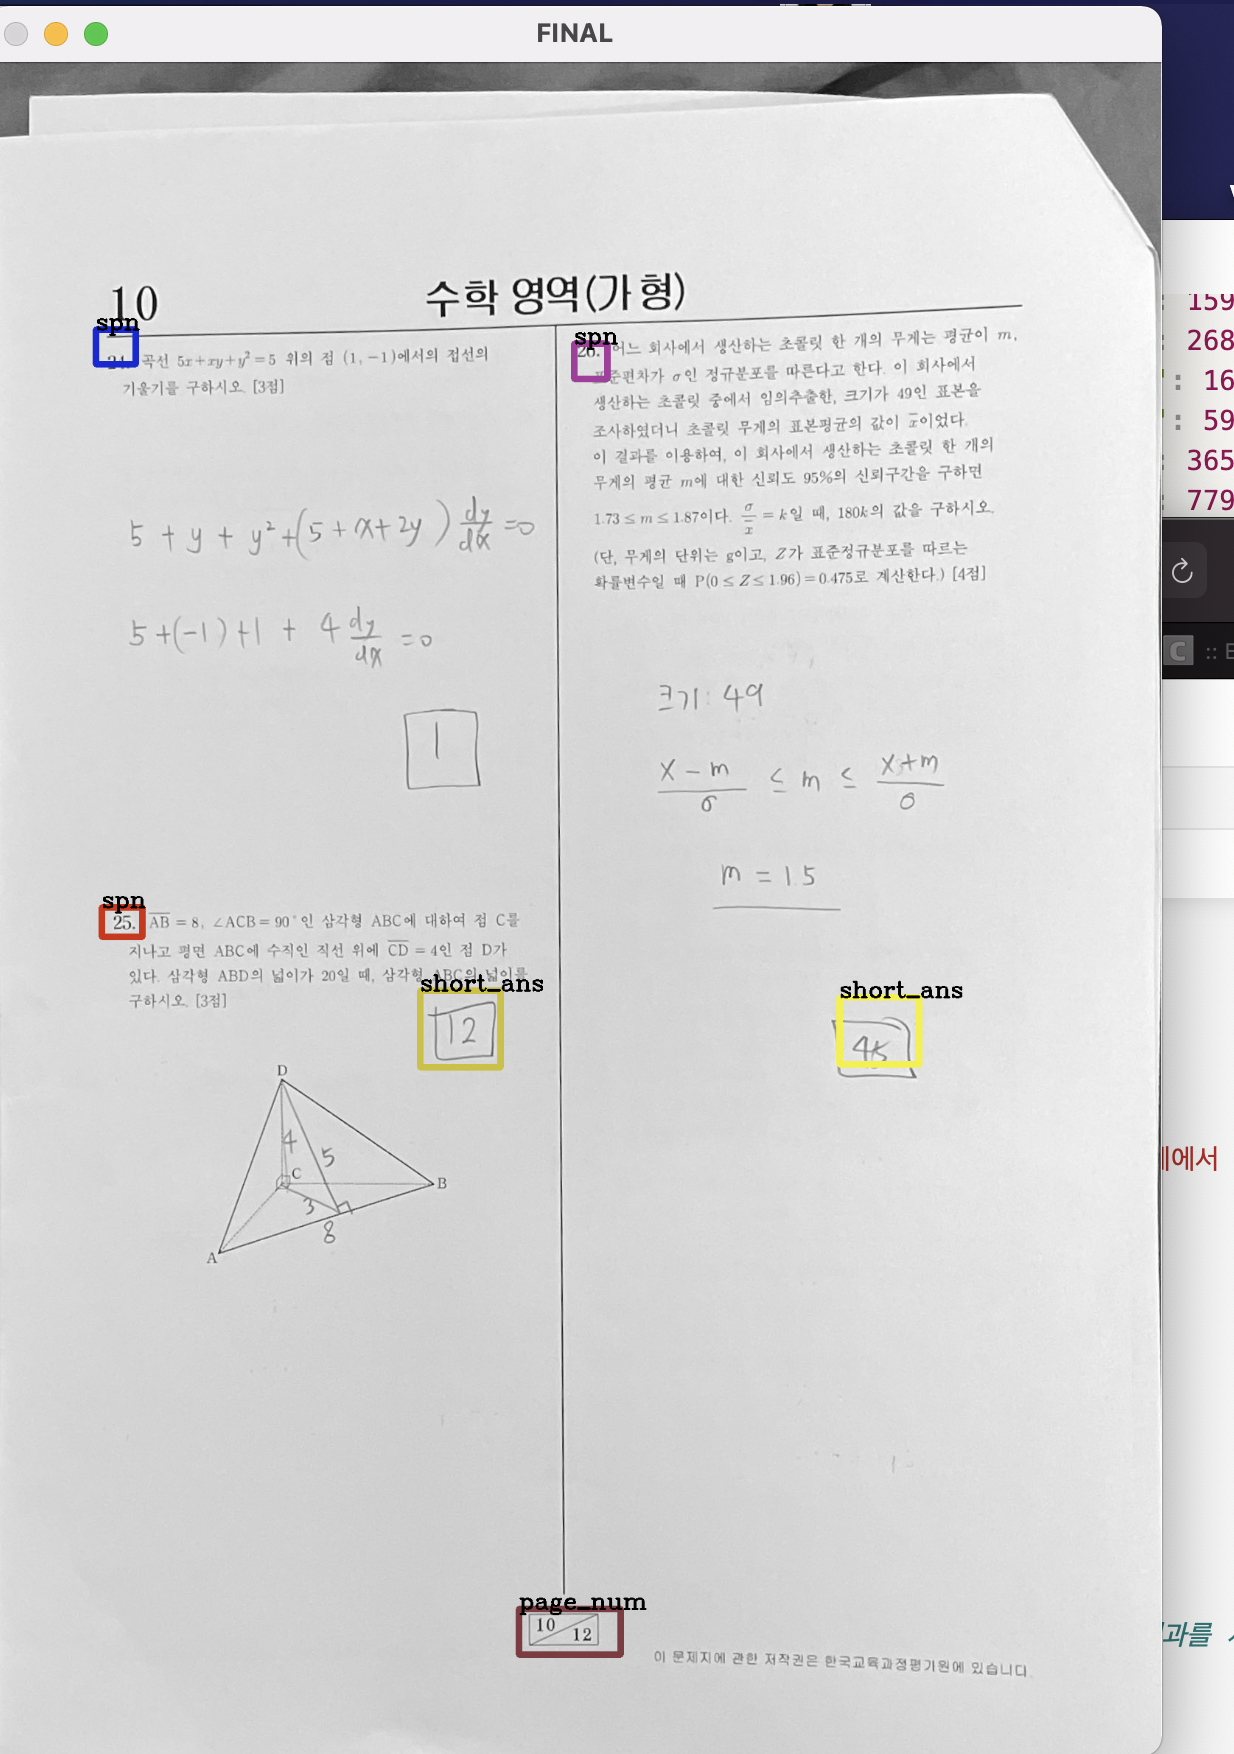
코드를 이용해서 처리하면 다음과 같이 깔끔하게 중복이 제거된 모습을 볼 수 있다.
5.OCR 적용
ocr은 카카오 API ocr을 활용했다.
#OCR적용

LIMIT_PX = 1024
LIMIT_BYTE = 1024*1024  # 1MB
LIMIT_BOX = 40


def kakao_ocr_resize(image_path: str):
    """
    ocr detect/recognize api helper
    ocr api의 제약사항이 넘어서는 이미지는 요청 이전에 전처리가 필요.

    pixel 제약사항 초과: resize
    용량 제약사항 초과  : 다른 포맷으로 압축, 이미지 분할 등의 처리 필요. (예제에서 제공하지 않음)

    :param image_path: 이미지파일 경로
    :return:
    """
    image = image_path

    height, width, _ = image.shape

    if LIMIT_PX < height or LIMIT_PX < width:
        ratio = float(LIMIT_PX) / max(height, width)
        image = cv2.resize(image, None, fx=ratio, fy=ratio)
        height, width, _ = height, width, _ = image.shape

        # api 사용전에 이미지가 resize된 경우, recognize시 resize된 결과를 사용해야함.
        image_path = "{}_resized.jpg".format(image_path)
        cv2.imwrite(image_path, image)

        return image_path
    return None


def kakao_ocr(image_path: str, appkey: str):
    """
    OCR api request example
    :param image_path: 이미지파일 경로
    :param appkey: 카카오 앱 REST API 키
    """
    API_URL = 'https://dapi.kakao.com/v2/vision/text/ocr'

    headers = {'Authorization': 'KakaoAK {}'.format(appkey)}

    image = image_path
    jpeg_image = cv2.imencode(".jpg", image)[1]
    data = jpeg_image.tobytes()


    return requests.post(API_URL, headers=headers, files={"image": data})
이 부분까지는 구글에서 카카오 api검색으로 구현하는 코드들을 참고했다.
def read_ocr(image):
    if len(sys.argv) != 3:
        print("Please run with args: $ python example.py /path/to/image appkey")
    appkey = 'c858cbb7294b2c96b1287054dd31337f'
    white = [255,255,255]
    img=image
    image_path = image
    constant= cv2.copyMakeBorder(img,200,100,100,100,cv2.BORDER_CONSTANT,value=white)
    #image_path='/content/drive/MyDrive/GRADING_Study/kh/hand/ex/sw.jpeg'
    #cv2.imwrite(image_path, constant)
    #cv2_imshow(constant)
    image_path=constant
    time.sleep(2)
    resize_impath = kakao_ocr_resize(image_path)
    if resize_impath is not None:
        image_path = resize_impath
        print("using resized image")

    cv2.imshow("img20",image_path)
    k = cv2.waitKey(0)
    cv2.destroyWindow("img2")

    output = kakao_ocr(image_path, appkey).json()
    #print("[OCR] output:\n{}\n".format(json.dumps(output, sort_keys=True,ensure_ascii=False, indent=2)))


    #하나의 이미지에서 여러개를 읽어냄  -> list에 저장해서 통째로 넘겨줌
    word_list=[]
    # 결과내에서 하나씩 골라서
    for out in (output['result']):
        #recognition_word dic부분을 추출해 append함
        outword = out['recognition_words'][0]
        word_list.append(outword)
    #print(word_list)
    #words = output['result'][0]['recognition_words'][0]
    #print("======OUTPUT======")
    #print(output)
    #print("========END=====")
    #리스트 return
    return word_list
이 부분은 졸업프로젝트 팀원과 함께 구현한 부분으로, cropped image는 너무 작아 제대로된 탐지를 해내지 못하는 경우가 많았다.
이부분에 대해서는 주변에 여백을 넣어주면 성능을 크게 향상 시킬 수 있었다.
copyMakeBorder을 이용하여 여백을 넣어주었으며,
cropped image에서 여러개의 문자를 읽어낼 경우에 그것을 전부 전달해 주어야 하므로, 리스트로 작성해서 return하였다.
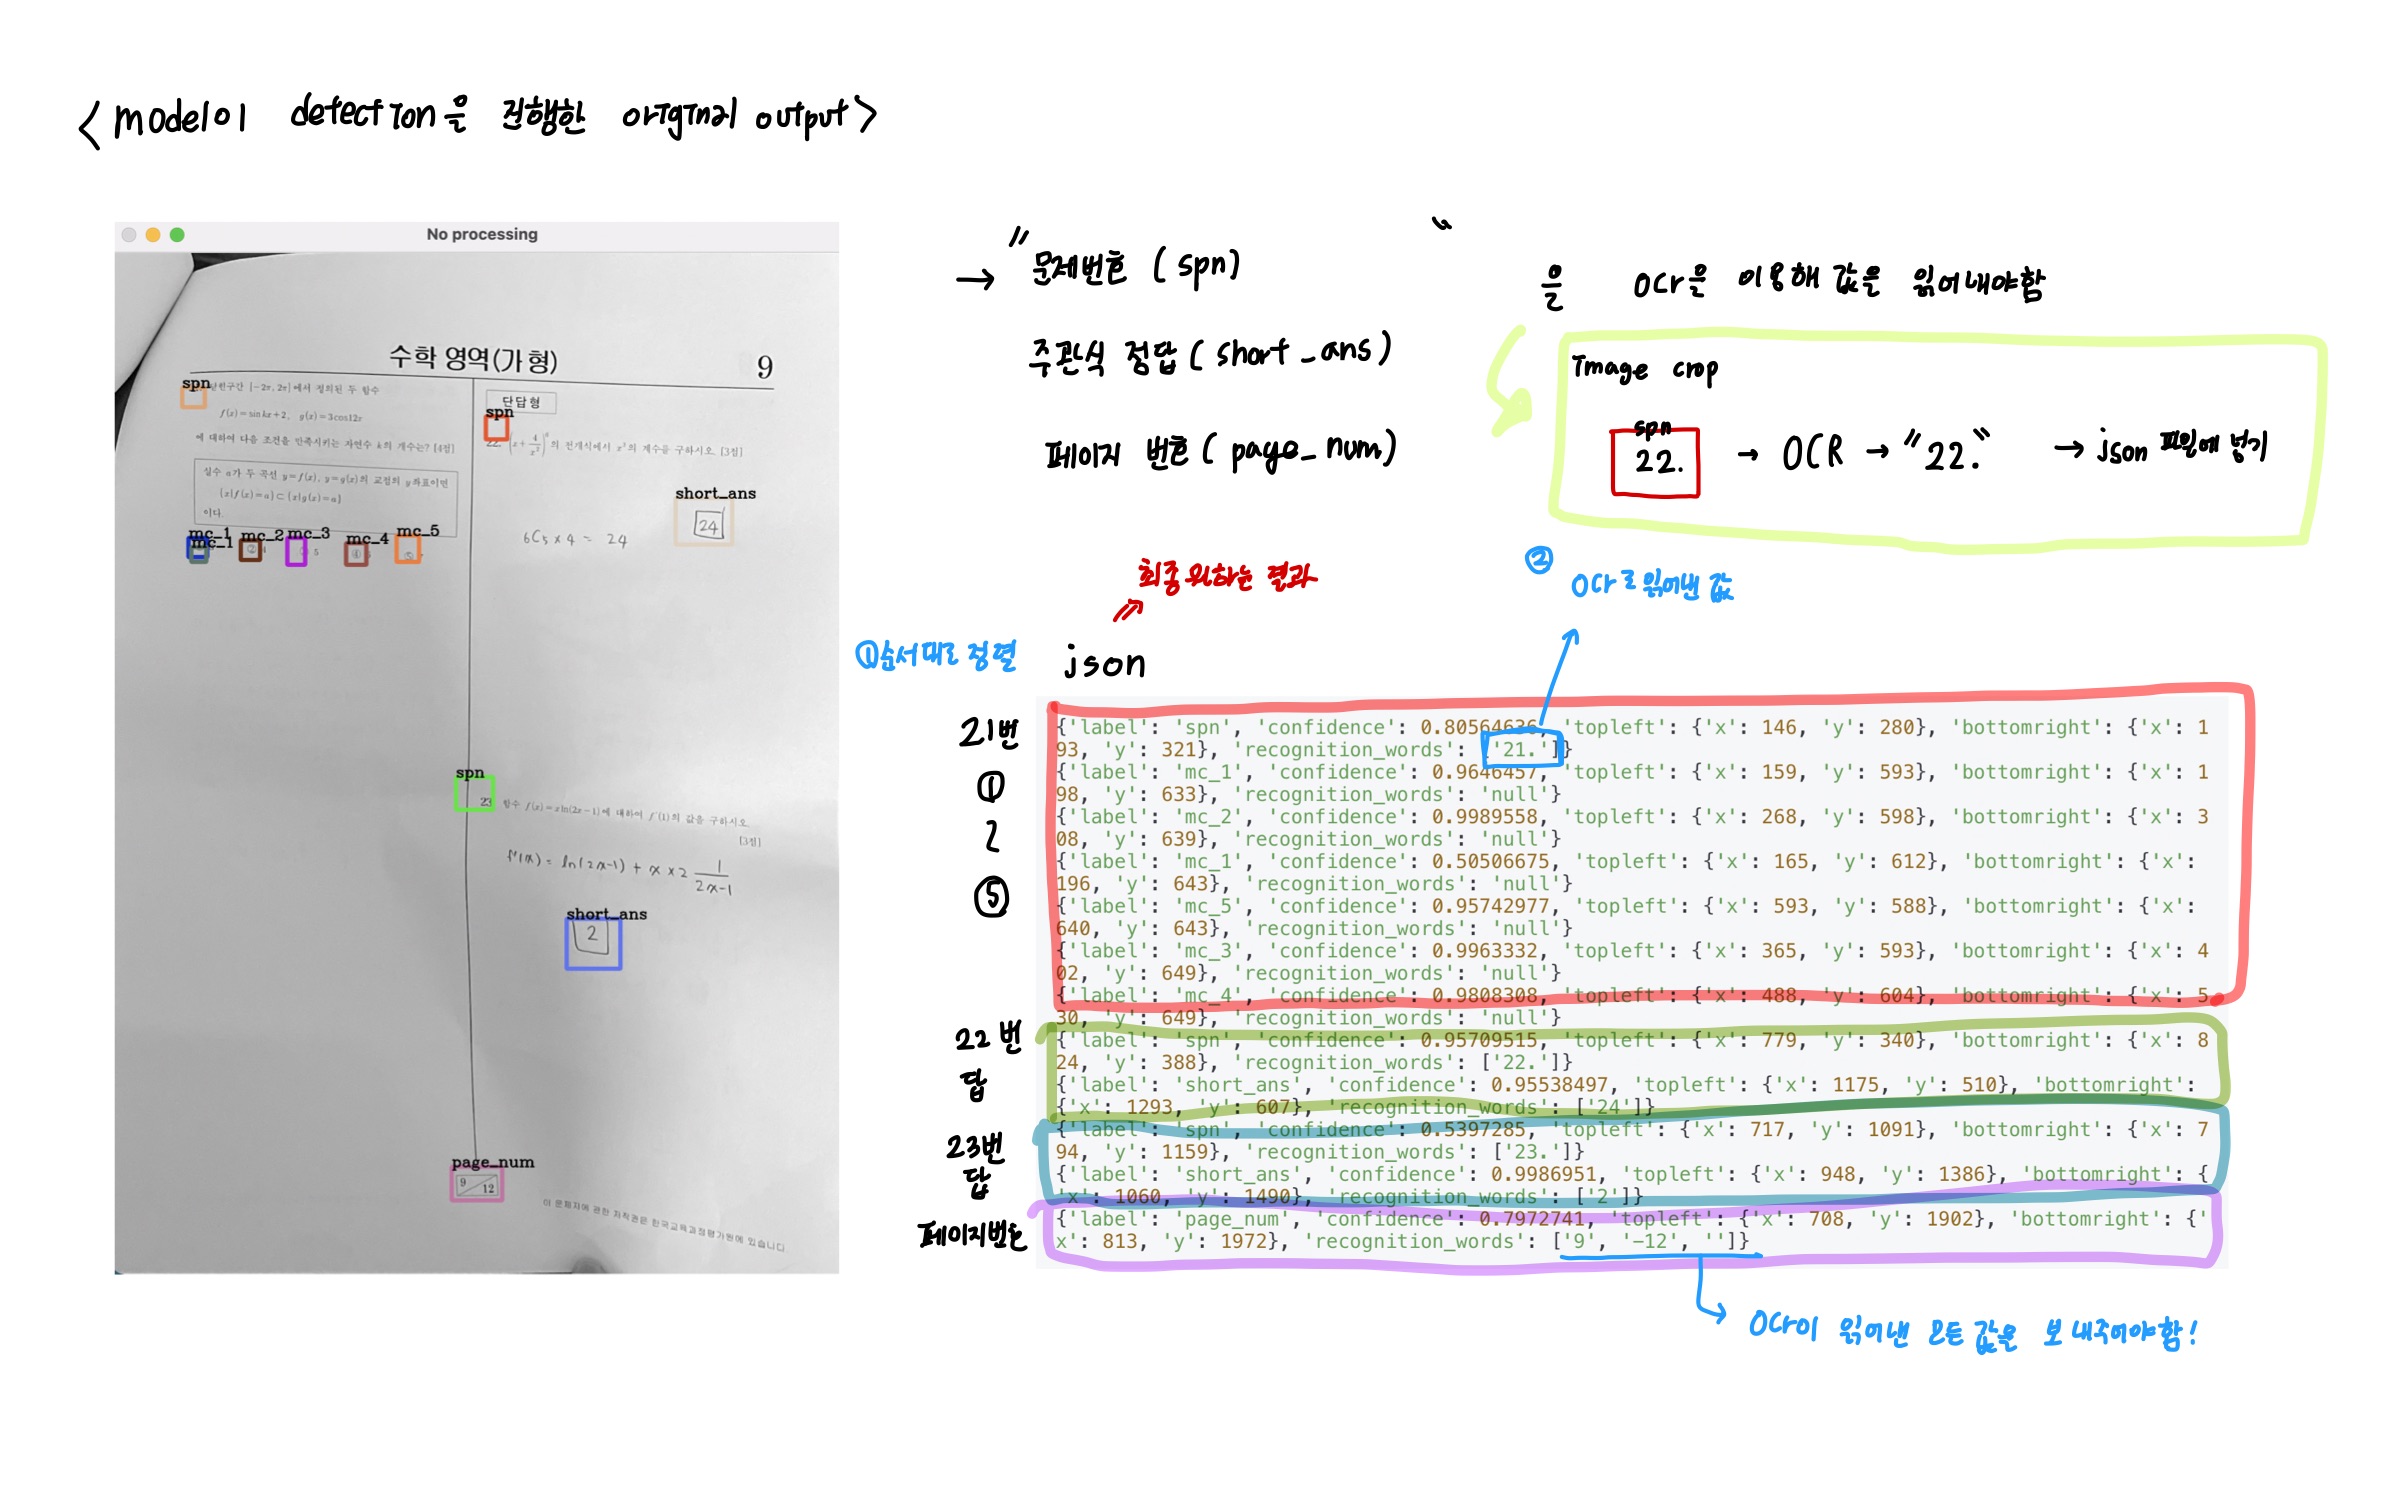
6. 최종
최종적으로 순서를 맞추고 중복을 제거한 json형식인 result_fix3를
spn/short_ans/page_num에 대해 이미지를 crop하여 ocr을 적용한다.
이 때, localization problem을 고려해서 여백을 20씩 부여하여 crop하여 ocr을 돌린 후
읽어낸 문자 list를 받아 json파일에 새로 추가한다.
만약, ocr이 적용되지 않아도 되는 object(객관식등) 의 경우 null을 삽입하여, 백엔드에서 같은 형식으로 받을 수 있도록 한다.
#최종 main

for result in (result_fix3):
    t1 = (result['topleft']['x'], result['topleft']['y'])
    br = (result['bottomright']['x'], result['bottomright']['y'])
    xa = t1[0]
    xb = br[0]
    ya = t1[1]
    yb = br[1]
    #croppend and ocr을 적용할 것들
    if(result['label']=='spn' or result['label']=='short_ans' or result['label']=='page_num'):
        #print(result)
        cropped_img = img5[ya-20:yb+20, xa-20:xb+20]
        #cv2.imshow("img20",cropped_img)
        #k = cv2.waitKey(0)
        #cv2.destroyWindow("img2")

        #잘라낸 이미지에 대해 ocr을 적용시킴
        recognition_words = read_ocr(cropped_img)
        #json파일에 새로운 dic을 추가함
        result['recognition_words'] = recognition_words
    #ocr이 적용되지 않을 mc등의 요소에는 null을 삽입
    else:
        result['recognition_words'] = 'null'

    print(result)


print("===============================")
print(result_fix3)
최종 return
{'label': 'spn', 'confidence': 0.80564636, 'topleft': {'x': 146, 'y': 280}, 'bottomright': {'x': 193, 'y': 321}, 'recognition_words': ['21.']}
{'label': 'mc_1', 'confidence': 0.9646457, 'topleft': {'x': 159, 'y': 593}, 'bottomright': {'x': 198, 'y': 633}, 'recognition_words': 'null'}
{'label': 'mc_2', 'confidence': 0.9989558, 'topleft': {'x': 268, 'y': 598}, 'bottomright': {'x': 308, 'y': 639}, 'recognition_words': 'null'}
{'label': 'mc_1', 'confidence': 0.50506675, 'topleft': {'x': 165, 'y': 612}, 'bottomright': {'x': 196, 'y': 643}, 'recognition_words': 'null'}
{'label': 'mc_5', 'confidence': 0.95742977, 'topleft': {'x': 593, 'y': 588}, 'bottomright': {'x': 640, 'y': 643}, 'recognition_words': 'null'}
{'label': 'mc_3', 'confidence': 0.9963332, 'topleft': {'x': 365, 'y': 593}, 'bottomright': {'x': 402, 'y': 649}, 'recognition_words': 'null'}
{'label': 'mc_4', 'confidence': 0.9808308, 'topleft': {'x': 488, 'y': 604}, 'bottomright': {'x': 530, 'y': 649}, 'recognition_words': 'null'}
{'label': 'spn', 'confidence': 0.95709515, 'topleft': {'x': 779, 'y': 340}, 'bottomright': {'x': 824, 'y': 388}, 'recognition_words': ['22.']}
{'label': 'short_ans', 'confidence': 0.95538497, 'topleft': {'x': 1175, 'y': 510}, 'bottomright': {'x': 1293, 'y': 607}, 'recognition_words': ['24']}
{'label': 'spn', 'confidence': 0.5397285, 'topleft': {'x': 717, 'y': 1091}, 'bottomright': {'x': 794, 'y': 1159}, 'recognition_words': ['23.']}
{'label': 'short_ans', 'confidence': 0.9986951, 'topleft': {'x': 948, 'y': 1386}, 'bottomright': {'x': 1060, 'y': 1490}, 'recognition_words': ['2']}
{'label': 'page_num', 'confidence': 0.7972741, 'topleft': {'x': 708, 'y': 1902}, 'bottomright': {'x': 813, 'y': 1972}, 'recognition_words': ['9', '-12', '']}
최종 백엔드로 넘어가는 형식은 다음과 같다
다음과 같은 detection에 대해 백엔드에서 채점기능을 데이터베이스 조회만으로 가능하게 편한형식으로 전처리를 마쳤다.
'졸업프로젝트 > YOLO' 카테고리의 다른 글
| First try (0) | 2021.04.15 |
|---|---|
| [YOLO+flask] 초기 환경 설정 (0) | 2021.03.31 |
| [YOLO] Image Labeling 의문 사항들 (0) | 2021.03.12 |
| [YOLO] python xml,이미지 파일 PNG to JPG (0) | 2021.03.10 |
| [YOLO] Darknet 공식문서 번역 (0) | 2021.03.08 |

