생활코딩 : 리액트 편을 보고 작성된 게시글입니다.
동적으로 발생하는 event 표현하기 prop, state를 모두 사용!
EVENT
State를 이용하여 상태를 확인하고, 상태에 따라 prop값을 변경하여 동적인 페이지를 만들기
목표
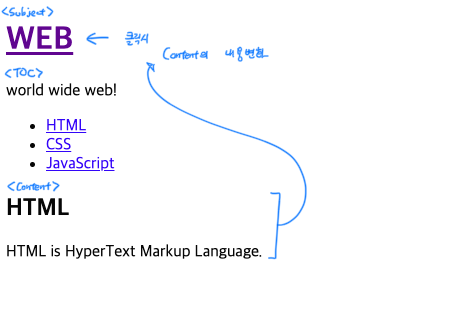
를 해주는 event표현하기
1단계 : State를 부여하고 그에 따라 props값을 변경해주기
State & render()
React에서는 State의 값이 변경되면,
변경된 State값을 가지는 Component들의 render()함수 (+ 그 하위의 Component들의 render()함수) 들이 다시 호출됨
render()
어떤 HTML을 그리는지 결정함
즉, State가 변경되면, render()함수가 재 호출된다는 의미는
State나 props의 값이 변경되면 html(보여지는 화면)이 다시 그려진다는 의미
어떤 상황에 따라 다른 문구를 표시하기 위해서는 "if-else문을 사용"
상황에 따라 화면을 다시 그려주어야 하므로 State값을 사용하고, State값을 이용하여 어떤 상황인지를 나타내주면 될 것
1) State에 상황을 나타내는 값을 부여
class App extends Component {

  constructor(props){
    super(props);

    this.state ={
      mode : 'welcome',
      subject : {title:"WEB", sub:"world wide web!"},
      welcome : {title:"welcome", desc:"hello, react!"},
      contents : [
        {id:1, title:'HTML', desc:'HTML is for information'},
        {id:2, title:'CSS', desc:'CSS is for design'},
        {id:3, title:'JavaScript', desc:'JavaScript is for interactive'}
      ]
    }

  }
State에 mode를 추가하여, 초기상태인 'welcome'상태로 지정함.
또한 이에 맞추어 welcome상태일 때 Subject 컴포넌트에 출력해줄 메세지를 지정함
2) render()에 상황을 판단하여 props값을 변경
render(){
var _title, _desc = null;
//어떤 상태일지 판단
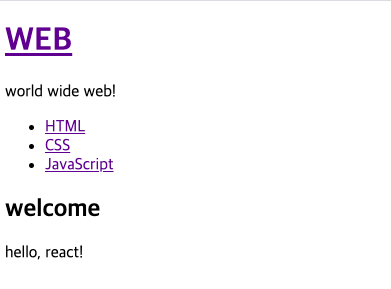
if(this.state.mode === 'welcome')
{
_title = this.state.welcome.title;
_desc = this.state.welcome.desc; //welcome mode일 경우 welcome 문구
}
else if(this.state.mode === 'read') //임의로 지정
{
_title = this.state.contents[0].title; //임의로 지정(어떤 목차냐에 따라 다르게 만들어주어야함)
_desc = this.state.contents[0].desc; //content[0]은 HTML임
}
return (
<div className="App">
<Subject title={this.state.subject.title} sub={this.state.subject.sub}></Subject>
<TOC data={this.state.contents}></TOC>
<Content title={_title} desc={_desc}></Content>
</div>
);
}if-else문을 이용하여 지금 mode가 welcome mode인지, read mode인지 판단하여
Content에 넘겨줄 props값을 수정함
결과
| mode : "welcome" | mode : "read" |
 |
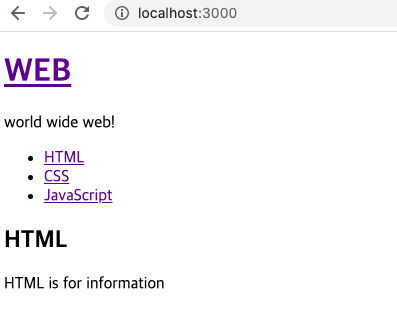 |
이제 mode : "read"로 설정해 두고, 실습을 위해 잠시 Subject Component를 막아두고 풀어해쳐서 가져와준다
import React, { Component } from 'react';
import './App.css';
import TOC from "./components/TOC";
import Subject from "./components/Subject"
import Content from './components/Content';


class App extends Component {

  constructor(props){
    super(props);

    this.state ={
      mode : 'read', //read로 변경
      subject : {title:"WEB", sub:"world wide web!"},
      welcome : {title:"welcome", desc:"hello, react!"},
      contents : [
        {id:1, title:'HTML', desc:'HTML is for information'},
        {id:2, title:'CSS', desc:'CSS is for design'},
        {id:3, title:'JavaScript', desc:'JavaScript is for interactive'}
      ]
    }

  }


render(){
  var _title, _desc = null;

  if(this.state.mode === 'welcome')
  {
    _title = this.state.welcome.title;
    _desc = this.state.welcome.desc;
  }
  else if(this.state.mode === 'read')
  {
    _title = this.state.contents[0].title;
    _desc = this.state.contents[0].desc;
  }
    return (
      <div className="App">
        {/* 일단은 이 부분을 다른 Subject Component로 사용하지 않고 풀어서 이벤트를 구현하고 나중에 분리
        <Subject title={this.state.subject.title} sub={this.state.subject.sub}></Subject>  */}

        /*Subject부분을 주석처리 후 대체 */
        <header>
          <h1><a href='/'}>{this.props.title}</a></h1>
          {this.props.sub}
        </header>

        <TOC data={this.state.contents}></TOC>
        <Content title={_title} desc={_desc}></Content>
      </div>
      );

}
}

export default App;
주석처리 단축키 " Cmd + / "
2단계 : onClick()을 이용하여 State값을 변화시키기 ("welcome"<-->"read")
1) 태그의 본래 기능 막기
onClick={} 함수
(js에서는 onclick()이지만, react에서는 onClick={}) 특정 태그를 클릭할 경우 실행되는 함수
<a href="/" onClick={function(){클릭시 실행될 내용}}> 문구 </a>
e.preventDefault();
event를 표현하고 싶은 경우 특정한 상황에서는 해당 태그의 본래의 기능이 실행되어서는 안되는 상황이 발생
그럴때, 본래 태그의 기능을 막아주는 함수
ex) Subject 내의 코드
        <header>
          <h1><a href='/' onClick={function(e){
            console.log(e);
            e.preventDefault();//태그의 기본적인 동작방법을 막음
          }>{this.state.subject.title}</a></h1>
          {this.state.subject.sub}
        </header>
-> 이런 경우 <a>tag본래의 기능인 페이지 링크가 발생하지 않는다(page가 reload되지 않음)
클릭시 'read' --> 'welcome'으로 전환
.bind(this)
onClick 내에서 this를 사용할 경우 그것이 무엇인지 정확히 인지하지 못하므로 bind를 추가하여 알려줌
        <header>
          <h1><a href='/' onClick={function(e){
            console.log(e);
            e.preventDefault();//태그의 기본적인 동작방법을 막음
          }.bind(this)}>{this.props.title}</a></h1>

          {this.props.sub}
        </header>
render()함수 내에서 this는 render함수가 속해있는 component자체를 가리킴
onClick={}내에서는 this가 아무런 의미도 가지지 못함
.bind(this)를 이용해 강제로 this에 의미를 부여할 수 있음
What is bind?
함수명.bind(object명);"함수명"함수 내에서 this는 object명이라는 object를 의미하게 되는 새로운 함수가 복제되어 생성됨
this.setState
컴포넌트 생성 이후에 State를 변경하는 방법
즉, this.state.state명 = "변경할 내용" <-이게 불가능 리액트가 값이 바뀌었는지 인지 불가
this.setState({변환할 State의 내용});
        <header>
          <h1><a href='/' onClick={function(e){
            console.log(e);
            e.preventDefault();//태그의 기본적인 동작방법을 막음
            this.setState({
              mode:'welcome'
            });
          }.bind(this)}>{this.state.subject.title}</a></h1>
          {this.state.subject.sub}
        </header>
결과 : 클릭시 read--->welcome으로 전환됨
App.js
import React, { Component } from 'react';
import './App.css';
import TOC from "./components/TOC";
import Subject from "./components/Subject"
import Content from './components/Content';


class App extends Component {

  constructor(props){
    super(props);

    this.state ={
      mode : 'read',
      subject : {title:"WEB", sub:"world wide web!"},
      welcome : {title:"welcome", desc:"hello, react!"},
      contents : [
        {id:1, title:'HTML', desc:'HTML is for information'},
        {id:2, title:'CSS', desc:'CSS is for design'},
        {id:3, title:'JavaScript', desc:'JavaScript is for interactive'}
      ]
    }

  }


render(){
  var _title, _desc = null;

  if(this.state.mode === 'welcome')
  {
    _title = this.state.welcome.title;
    _desc = this.state.welcome.desc;
  }
  else if(this.state.mode === 'read')
  {
    _title = this.state.contents[0].title;
    _desc = this.state.contents[0].desc;
  }
    return (
      <div className="App">
        {/* 일단은 이 부분을 다른 Subject Component로 사용하지 않고 풀어서 이벤트를 구현하고 나중에 분리
        <Subject title={this.state.subject.title} sub={this.state.subject.sub}></Subject>  */}

        <header>
          <h1><a href='/' onClick={function(e){
            console.log(e);
            e.preventDefault();//태그의 기본적인 동작방법을 막음
            this.setState({
              mode:'welcome'
            });
          }.bind(this)}>{this.state.subject.title}</a></h1>
          {this.state.subject.sub}
        </header>

        <TOC data={this.state.contents}></TOC>
        <Content title={_title} desc={_desc}></Content>
      </div>
      );

}
}

export default App;
컴포넌트 event 만들기
->prop로 원하는 내용의 event를 만들기
이제 Subject Component를 되살려봅시다. (App.js에 구현했던 subject부분을 다시 분리된 컴포넌트로 제작)
App.js
 <Subject title={this.state.subject.title}
        sub={this.state.subject.sub}
        onChangePage={function(){
        //실행되길 원하는 내용을 작성함 (우리의 경우는 mode를 변경하는 함수)
          this.setState({
          	mode : 'welcome'
          })
        }.bind('this')}>
</Subject>
Subject Component에 onChangePage라는 함수를 만듬 -> 실행되길 원하는 event를 넣음
즉, 내가 제작한 Subject Component를 누군가 사용할 때
그 컴포넌트를 사용하는 사람이 자신이 실행되길 원하는 함수를 만들어 낼 수 있음
->onChangePage함수가 Subject.js로 prop로 전달됨
Subject.js
class Subject extends Component {
    render(){
      return(
        <header>
          <h1><a href='/' onClick={function(e){
            e.preventDefault();
            this.props.onChangePage();
          }.bind(this)}>{this.props.title}</a></h1>
          {this.props.sub}
        </header>
      );
    }
  }
원래 본래의 태그의 기능을 막고 subject tag에서 props로 넘어온 함수를 호출함
최종
import React, { Component } from 'react';
import './App.css';
import TOC from "./components/TOC";
import Subject from "./components/Subject"
import Content from './components/Content';


class App extends Component {

  constructor(props){
    super(props);

    this.state ={
      mode : 'read',
      subject : {title:"WEB", sub:"world wide web!"},
      welcome : {title:"welcome", desc:"hello, react!"},
      contents : [
        {id:1, title:'HTML', desc:'HTML is for information'},
        {id:2, title:'CSS', desc:'CSS is for design'},
        {id:3, title:'JavaScript', desc:'JavaScript is for interactive'}
      ]
    }

  }


render(){
  var _title, _desc = null;

  if(this.state.mode === 'welcome')
  {
    _title = this.state.welcome.title;
    _desc = this.state.welcome.desc;
  }
  else if(this.state.mode === 'read')
  {
    _title = this.state.contents[0].title;
    _desc = this.state.contents[0].desc;
  }
    return (
      <div className="App">

        <Subject title={this.state.subject.title}
        sub={this.state.subject.sub}
        onChangePage={function(){
          this.setState({
            mode : 'welcome'
          })
        }.bind('this')}></Subject>

        <TOC data={this.state.contents}></TOC>
        <Content title={_title} desc={_desc}></Content>
      </div>
      );

}
}

export default App;
이제 목차를 누르면 그에 해당하는 contents desc와 title이 출력되도록 해봅시다.
 |
 |
위와 같은 방법으로 진행
1) welcome ----> read로 상태 변경
App.js
<TOC onChangePage={function(){

            this.setState({mode : 'read'});

        }.bind(this)}
        data={this.state.contents}>
</TOC>
mode를 read로 변경해줌
TOC.js
import React, { Component } from 'react';
class TOC extends Component{
  render(){
    var lists = []; //html내의 list를 반복적으로 출력해줄 리스트

    var data = this.props.data;
    //컴포넌트의 속성으로 들어온 data값을 저장해줌 -> 상위 컴포넌트에서 state에 주어진 content배열임

    var i = 0; //반복문을 위한 변수


    //<li><a href=?>??</a></li> 형식을 지켜 리스트에 넣어줌
    while(i< data.length){ //데이터의 길이만큼 반복
      lists.push(
      <li key={data[i].id}>
        <a
          href={"/content/"+data[i].id}
          onClick={ function(e){
            e.preventDefault();
            this.props.onChangePage();
          }.bind(this)}
          >{data[i].title}</a>
        </li>);
      i = i + 1;
    }

    return(
      <nav>
        <ul>
          {lists}
        </ul>
      </nav>
    );
  }
}

  export default TOC; //외부에서 사용을 허용
<li><a></a></li> 부분 a에서 onChangePage()함수를 담아서 만들어 주도록 변경
2) 현재 선택된 content를 id를 이용해 판별
class App extends Component {

  constructor(props){
    super(props);

    this.state ={
      mode : 'read',
      subject : {title:"WEB", sub:"world wide web!"},
      selected_content_id : 2, // 선택된 content의 id를 표현 (default값으로 2


      //생략
결국 selected_content_id를 원하는 content의 id로 변경시켜 줄 수 있으면 됨
      contents : [
        {id:1, title:'HTML', desc:'HTML is for information'},
        {id:2, title:'CSS', desc:'CSS is for design'},
        {id:3, title:'JavaScript', desc:'JavaScript is for interactive'}
      ]
이들 중 원하는 것의 id로...
App.js
<TOC onChangePage={function(){

            this.setState({
              mode : 'read'
              selected_content_id = num;
            });


        }.bind(this)}
        data={this.state.contents}></TOC>
결국 num이라는 임시의 변수를 지정하고, 해당 num이라는 변수가 onChangePage를 호출할 때 매개변수로 넘어오게 만든 후
selected_content_id에 대입해주면 됨
onChangePage가 호출되는 곳은 TOC.js 내부의 onClick함수
TOC.js
    while(i< data.length){ //데이터의 길이만큼 반복
      lists.push(
      <li key={data[i].id}>
        <a
          href={"/content/"+data[i].id}
          onClick={ function(e){
            e.preventDefault();
            this.props.onChangePage(num);
          }.bind(this)}
          >{data[i].title}</a>
        </li>);
      i = i + 1;
    }
이 또한 임시의 값 num으로 표현하고..
이렇게 호출할때 값을 넘겨주면 성공적으로 변경이 가능해짐
-> 이제 어떻게 num이라는 변수는 선택된 컨탠츠의 id를 넘겨줄 수 있을까
먼저 data의 id를 저장하는 data-id라는 속성을 새로 생성해줌
TOC.js
ists.push(
      <li key={data[i].id}>
        <a
          href={"/content/"+data[i].id}
          data-id = {data[i].id}
          onClick={ function(e){
            e.preventDefault();
            this.props.onChangePage();
          }.bind(this)}
          >{data[i].title}</a>
        </li>);
이 data-id는 어디에 저장되어 표현되는지 확인해보면
e.target : tag자체를 의미
즉, 아래 <a> 중략 </a> 를 의미
        <a
          href={"/content/"+data[i].id}
          data-id = {data[i].id}
          onClick={ function(e){
            e.preventDefault();
            this.props.onChangePage();
          }.bind(this)}
          >{data[i].title}</a>
이제 a태그 내의 속성은 어디에 저장되어 있는지 살펴보면
e.target.dataset 내에 저장되어 있고 "-" 인 경우 -다음의 이름으로 저장됨
즉, e.target.dataset.id 에 우리가 원하는 selected_content_id 가 저장되어있음
(이런 정보는 개발자 모드에서 확인가능)
이제 num대신 e.target.dataset.id를 대입하면됨
TOC.js
    while(i< data.length){ //데이터의 길이만큼 반복
      lists.push(
      <li key={data[i].id}>
        <a
          href={"/content/"+data[i].id}
          data-id = {data[i].id}
          onClick={ function(e){
            e.preventDefault();
            this.props.onChangePage(e.target.dataset.id);
          }.bind(this)}
          >{data[i].title}</a>
        </li>);
      i = i + 1;
    }
App.js
넘겨받은 정보를 id로 지정하여 String -> int로 변환한 후 대입
<TOC onChangePage={function(id){

            this.setState({
              mode : 'read',
              selected_content_id : Number(id)
            });


        }.bind(this)}
        data={this.state.contents}></TOC>
전체 코드
App.js
import React, { Component } from 'react';
import './App.css';
import TOC from "./components/TOC";
import Subject from "./components/Subject"
import Content from './components/Content';


class App extends Component {

  constructor(props){
    super(props);

    this.state ={
      mode : 'read',
      subject : {title:"WEB", sub:"world wide web!"},
      selected_content_id : 2,
      welcome : {title:"welcome", desc:"hello, react!"},
      contents : [
        {id:1, title:'HTML', desc:'HTML is for information'},
        {id:2, title:'CSS', desc:'CSS is for design'},
        {id:3, title:'JavaScript', desc:'JavaScript is for interactive'}
      ]
    }

  }


render(){
  var _title, _desc = null;

  if(this.state.mode === 'welcome')
  {
    _title = this.state.welcome.title;
    _desc = this.state.welcome.desc;
  }
  else if(this.state.mode === 'read')
  {
    var i = 0;
    while(i<this.state.contents.length){
        var data = this.state.contents[i];
        if(data.id === this.state.selected_content_id){
          _title = data.title;
          _desc = data.desc;
          break;
        }
      i=i+1;
    }
  }
    return (
      <div className="App">

        <Subject
          title={this.state.subject.title}
          sub={this.state.subject.sub}
          onChangePage={function(){
          this.setState({mode:'welcome'});
        }.bind(this)}
        ></Subject>

        <TOC onChangePage={function(id){

            this.setState({
              mode : 'read',
              selected_content_id : Number(id)
            });


        }.bind(this)}
        data={this.state.contents}></TOC>


        <Content title={_title} desc={_desc}></Content>
      </div>
      );

}
}

export default App;
TOC.js
import React, { Component } from 'react';
class TOC extends Component{
  render(){
    var lists = []; //html내의 list를 반복적으로 출력해줄 리스트

    var data = this.props.data;
    //컴포넌트의 속성으로 들어온 data값을 저장해줌 -> 상위 컴포넌트에서 state에 주어진 content배열임

    var i = 0; //반복문을 위한 변수


    //<li><a href=?>??</a></li> 형식을 지켜 리스트에 넣어줌
    while(i< data.length){ //데이터의 길이만큼 반복
      lists.push(
      <li key={data[i].id}>
        <a
          href={"/content/"+data[i].id}
          data-id = {data[i].id}
          onClick={ function(e){
            e.preventDefault();
            this.props.onChangePage(e.target.dataset.id);
          }.bind(this)}
          >{data[i].title}</a>
        </li>);
      i = i + 1;
    }

    return(
      <nav>
        <ul>
          {lists}
        </ul>
      </nav>
    );
  }
}

  export default TOC; //외부에서 사용을 허용
다른방법 ) .bind()를 이용
bind 함수의 두번째 인자로 들어온 값을 onClick함수의 첫번째 매개변수의 값으로 넣어줌 (기존에 있었던 것은 두번째... 매개변수로 밀림)
<li key={data[i].id}>
        <a
          href={"/content/"+data[i].id}
          data-id = {data[i].id}
          onClick={ function(id, e){ //원래 있었던 매개변수인 e가 두번째 매개변수로 밀린모습
            e.preventDefault();
            this.props.onChangePage(id);
          }.bind(this, data[i].id)}
          >{data[i].title}</a>
        </li>);
결과
 |
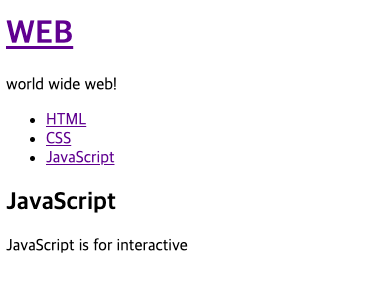 |
WEB을 누르면 welcome message가
목차를 누르면 각각에 맞는 title과 content의 내용이 뜸
page를 전환하거나 바꾸지 않고 react만을 이용해서 컨탠츠가 다이나믹하게 변경됨!
정리
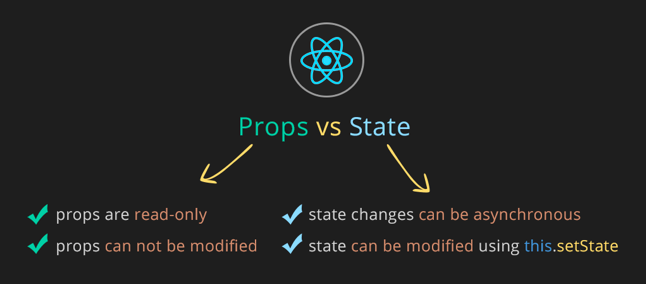
props는 전달을 받은 component내부에서 변경이 불가능 //하위 컴포넌트에 전달시 사용
State는 this.setState(event)를 이용하여 전달받은 component내에서도 변경이 가능 // 상위 컴포넌트에 전달시 사용
props / state의 변경은 render함수를 호출함

참고영상
생활코딩
- React 16.1 이벤트 state props 그리고 render함수
- React 16.2 이벤트 설치
- React 16.3 이벤트에서 state 변경하기
- React 16.4 이벤트 setState 함수 이해하기
- React 17.1 컴포넌트 이벤트 만들기
- React 17.2 컴포넌트 이벤트 만들기
- React 17.3 컴포넌트 이벤트 만들기
- React - 18. 베이스 캠프
'Frontend > React' 카테고리의 다른 글
| [React] Update, Delete기능 구현 (0) | 2020.11.18 |
|---|---|
| [React] Create기능 구현 (0) | 2020.11.18 |
| [React] State (0) | 2020.11.17 |
| [React] Component (0) | 2020.11.17 |
| [React]기초용어 + build (0) | 2020.11.17 |


